Thursday, October 27, 2011

Rosette Tutorial using Border Punches or Gypsy


Hello Everyone!  When I saw the new Cricut cartridge Ribbons & Rosettes, I fell in LOVE!!  I wanted to see if I could make rosettes using the Martha Stewart border punches.  You could also use your gypsy to make them.  The Martha Stewart Cake cartridges have some really nice borders that would work or you could design your own using your gypsy.  I have put together a tutorial on how I did them with the MS border punches.


First cut your paper to your desired size.  My paper measures 2 1/2 x 12.  Depending on how big you want your rosette, will determine how many strips you will need to make.  I used 2 strips to make this rosette.  So you will want to cut 2 strips at 2 1/2 x 12 to make the rosette in this tutorial.
Then using your Martha Stewart border punch, punch one side (12" length).
 Next, I used my Martha Steward score board and scored every 1/4 inch.  I didn't score up to the top where the punch is because I didn't want it to rip.  Just start to score under the punched area to the bottom of the strip.
After you get all your score marks, carefully accordion fold (back and forth) the paper.
 This is what it will look like after it is all folded.

After you make 2 of the strips, you will want to glue the end together.   Now you will need to gather the rosette together so you have a small hole in the middle.  This takes a little patience.  Be careful not to tear the border that you punched.  I punched a small circle and glued to the back to hold it together.  I would recommend using hot glue to glue the circle.  I tried my atg glue gun and it didn't work well so I used hot glue and it seemed to work great.
 Now you can embellish your rosette any way you want.  I chose to use prima flowers and a brad in the center.  I also used hot glue to glue the flower on to the rosette.


 I hope you have enjoyed this tutorial.  Can you imagine all the possibilities with all the different border punches available?  I plan on doing so much with these rosettes.  If you have any questions, please leave me a comment and I will be happy to answer them!

Recipe:

Martha Stewart border punch
Martha Stewart score board
blue scrapbooking paper
prima flowers
black brad

Thanks for stopping by and happy crafting!!

Wednesday, October 19, 2011

Ribbon and Twine Storage Tip

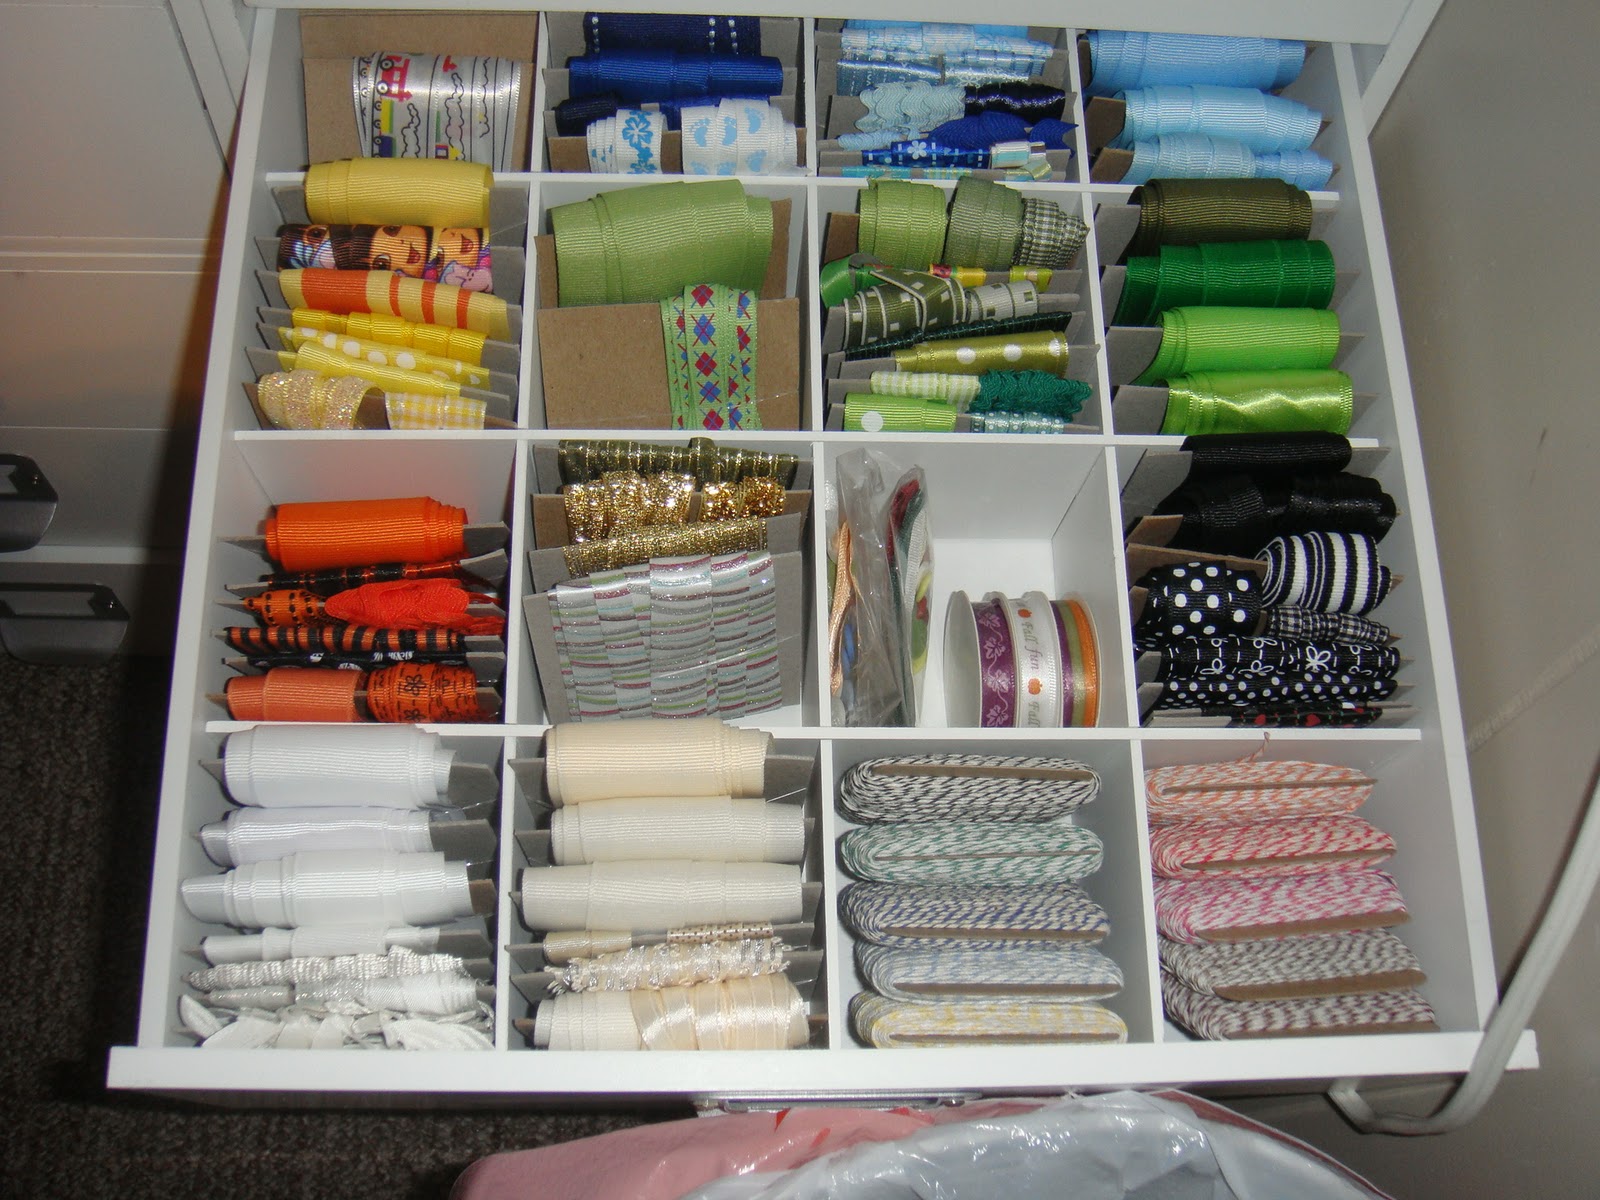
Hi Everyone!  Linda over at Paper Boutique is having an organizing tip contest.  I wanted to share a favorite organizing tip with everyone.  This is how I organize and store my ribbon and twine.  I store them in my Jetmax cubes (with dividers) from Michaels.  I found this tip on the cricut messageboard and LOVE it.  It is a super super space saver.  I wrap my ribbon on 3x3 chipboard (I use the back of the paper stacks).  Make sure you wrap it loosely so you don't have creases in your ribbon when you unroll it.  I also use another drawer (with dividers) to store my scrap ribbon.  This has saved me a TON of space and time.  I am not sorting through all my ribbon to find what I need.  I just open a drawer and I can see all the ribbon and colors.  It is also a great way to show when you are running low on a color and need to buy more.   I buy the clear (500 ct) hair bands from the dollar tree to hold the ribbon securely.
  
 Close up of the ribbon.  You can also wrap more than one style of ribbon on a card.
 My scrap drawer.  It is easy to see all my scraps and easy to remove and replace.

 This is my twine.  It already came wrapped on this chipboard and it fits nicely in the dividers.
I hope you all have enjoyed my tip and hope it is helpful to you!

Thanks for stopping by and happy crafting!!

Monday, October 17, 2011

Thanksgiving Turkey Card

Hi Everyone!!  I made this card for the Creative Cutter Room Challenge and the E.A.D Designs Color Challenge.  I am really happy with how it turned out.  I originally wanted to stamp "Thankful For...." or "Happy Thanksgiving" but the turkey was too tall and the hat over ran the sentiment.  Oh well, I will stamp it on the inside :)


 Recipe:
Orange Cardstock
Brown Cardstock
Thanksgiving Pattern Paper (DCWV Fall Stack 2)
White Gel Pen
Pop Dots
Cricut Cartridge:
  Create a Critter (turkey)

Thanks for stopping by and Happy Crafting!!!

Halloween Pumpkin Card

Hi Everyone!!  I made this halloween card for the My Creative Time Challenge.  You have to make a halloween card using an older card feature Cricut cartridge.  I use Wild Card cartridge for my card.  It is on page 68 and I also used the phrase button for the "Happy Halloween".  I have to admit this is the first time I have used this cartridge and I have had it for a long time.  I know shame on me.  There are alot of really cool images that you could use on regular cards and layouts too.


I really wanted to add some white gel pen to the pumpkins eyes and mouth, but I wanted to keep it simple and not overdue it!!  I am really happy with how the card turned out and will be visiting this cartridge more often.

Recipe:

Black, Orange, and green cardstock
Martha Stewart permanent marker ~Ebony~ .03mm
Cricut Cartridges:
  Wild Card

Thanks for stopping by and happy crafting!!!

Wednesday, October 12, 2011

Halloween Card

Hi Everyone!  I made this halloween card for the challenge over at My Craft Spot.  The challenge is a color challenge and to use black with orange, purple, or green.  My card has all 4 colors.  I picked up this halloween kit from Target a few years ago.  It contains halloween patterned paper and matching rub ons. 


Recipe:

Halloween Papered Paper
Halloween Rub Ons
Martha Stewart Spider Web punch
Marvy Scallop punch

Thanks for stopping by and Happy Crafting!!

Tuesday, September 27, 2011

Peachy Keen Lets Face it Friday Challenge ~ Sunsine Card

Hello Everyone!!  I made this card for the Peachy Keen Challenge.


Recipe:

Stampin Up Green Galore ink pad
Stampin Up Orchid Opulence ink pad
Peachy Keen In - Stitches Face Stamps
purple sheer riboon
Papers and cardstock from my scraps
Martha Stewart Sepia writing pen
Cricut Cartridges:
  Sweet Treats (flowers)
  Doodlecharms (sun)
  Lacy Labels

Thanks for stopping by and Happy Crafting!!!


Thursday, September 8, 2011

Teacher Treat Bag for PK Challenge

Hi Everyone!  I put together this little treat bag for the Peachy Keen Let's Face It Friday - Back to School Challenge.  This treat bag is super easy!  I baked cookies and my child wanted to take one for the teacher and I thought this was perfect for the challenge.


Recipe:

For A Special Teacher - hand written
Homemade Cookie
Ziplock Sandwich Bag
School Paper from my scraps
Stampin Up Chocolate Chip ink pad
Martha Stewart Writing Pen - Sepia
Peachy Keen Basic Paper Doll Face Stamp - 1 3/8"
Cricut Cartridges:
  Lacy Labels - base
  Doodlecharms - apple

Thanks for stopping by and happy crafting!!