Friday, July 6, 2012

Peachy Keen Chalk It Up Card Challenge

Hi Everyone!!  I am sooo super excited to show you this card I made for the Peachy Keen Challenge.  I LOVE this card!!!  


I saw a technique for the sun on Stamp TV on youtube.  This is a video you won't want to miss.  Click HERE for the video.  I used chalk and the applicator that came with the chalk.  Oh my goodness I LOVE how this sun came out.  Now this is my first attemp at this technique.  It is so easy.
 And a fabulous Peachy Keen face!!  The Happy Birthday sentiment is from Close t my Heart.
 I used black and white checkered ribbon from my stash.
 Here is a look at my sun in progress.  I did all the way around the paper (4" x 5 1/2").  Then I decided to cut it down and mat it on a card.  After I did all the rays, I went back with the same color and made circular motions in the center for the sun.  The sun and rays were made with the same tool and same color.  This is such a fabulous technique!!

 Here is the Pebbles chalk sets I used.  I used the classic chalk for the sun and used the pearl metallic chalk for the pink checks and a light yellow color accross the entire card for a shimmer affect.
Supplies:

  Black cardstock
  Yellow and white polka dot paper
  White cardstock
  Pebbles chalk sets
  Close to my Heart Happy Birthday Stamp set
  Peachy Keen Happy Lashes Face Stamps 1 1/8"
  Black Memento Ink Pad

Thanks so much for stopping by and happy crafting!!!!

Tri-Fold Card ~ Happy Birthday~

Hi Everyone!!  I wanted to share a card with you that I made with my gypsy.  I LOVE the Gypsy Made Simple videos Shelia from She's a Sassy Lady does.  And I am sooo excited to participate in this weeks Gypsy Made Simple challenge to make a 3 fold card.  HERE is the link to the video and challenge.  Here is the card I made.  I made this card from the Cricut Wild Card cartridge using basic shapes from the liner tab.  I welded the basic shapes together to make a template card.  Then I added the sentiment and party hat and welded them to the card template.  The card was cut out of brown cardstock.  Then I cut the layers out of Scenic Route paper.


 I cut the party hat from the Cricut Celebrations cartridge at 5.75" x 3.50".
 Here is the card opened.  I am going to add some white cardstock so I can write my message.
 The Happy Birthday sentiment was cut from the Martha Stewart Elegant Cake Art Cricut cartridge at 4' x 3.5'.
I absolutely LOVED doing this tri-fold card!!  I cannot wait to make another one!!

Supplies:

Brown cardstock
Scenic Route Paper- Grafton Collection (double sided)
                                 Chapman Street (green with white dots) Happy Birthday
                                  Laxton Ave - bottom of party hat
                                                        surf board paper
                                  James Street - top of the party hat
Gypsy
ATG gun
glue pen


Thanks so much for stopping by and happy crafting!!!

Monday, July 2, 2012

Organizing with Stampin Up stamp containers ~ ADHESIVE

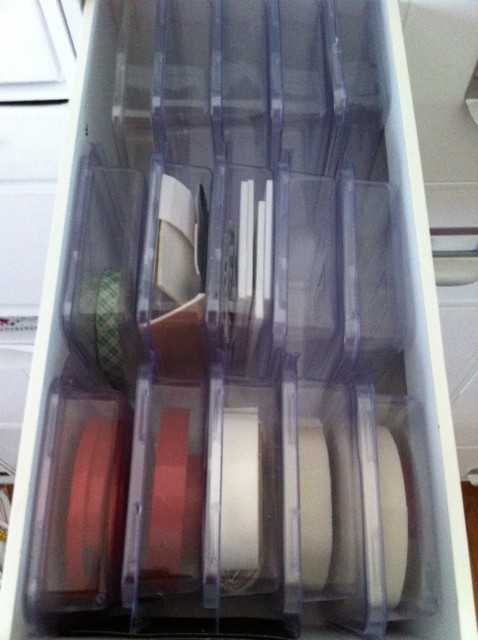
Happy Monday everyone!  I hope everyone had a great weekend!  I am back to show you another storage idea for adhesive with the Stampin Up stamp containers.  I am using the clear containers that the wooden stamps come in from Stampin Up.  I am using the ones that measure 4 1/4' x 5 1/4' in size.  I am also using the 4 drawer Jetmax white cube I got from Michaels.
 Here is the drawer with 15 containers inside.  WOW!!  I had all this adhesive in original packages in the drawer and with the packages this stuff took up the whole drawer.   After combining the adhesive in the Stampin Up containers, you can see how much room I have left.  I was amazed!!  I just LOVE LOVE LOVE how I can open the drawer and see exactly what is in what container.
 I have different sizes of double sided sticky tape and glue dots in each container.  I wrote the size of the double sided sticky tape on the inside of the rolls with black sharpy so I know what size I am using.
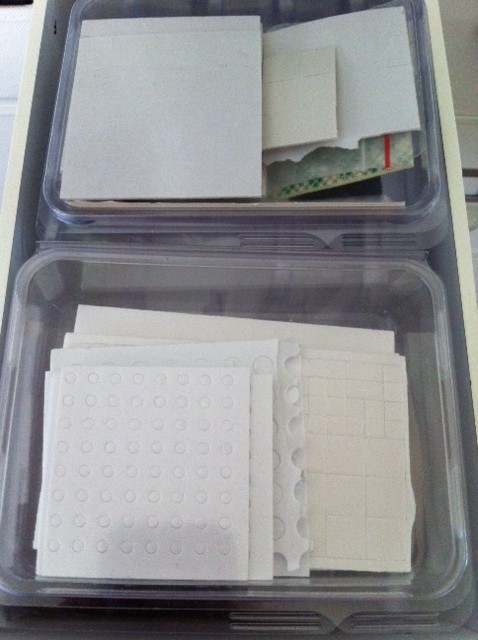
 These are miscellaneous foam dots and squares.  I love the fact that all sizes are in one container.  I put the container on my desk when doing projects and it saves time not hunting for the different sizes!
I am in LOVE with these container.  And I love how they fit in the cubes! 

You can see my post on how I stored my BUTTONS  in these containers HERE

Thanks so much for stopping by and happy crafting!!

Friday, June 29, 2012

Organizing with Stampin Up stamp containers ~Buttons~

Hi Everyone!  I found all of these Stampin Up containers at a school rummage sale.  I didn't need the wooden blocks but wanted the containers to use to store my craft stuff in my jetmax cubes.

There were several different sizes.  And if you are wondering YES I got all they had!!  You can never have too many containers!
These containers fit perfectly in the jetmax cubes.  I am going to show you how I am now storing my buttons in these containers.  I have a container for each color.  I need one more of the small containers to fit across perfectly. 
 Here is a close up of the drawer of button containers.  I LOVE how I can open the drawer and see exactly what is in the containers.
 Here is a close up of the pink button container.   When I want a button, I just pull out the container and I can see through it and turn it upside down to see if I have the right size/color button I need.
 Here is the jetmax cube I store them in.  It holds 11 of this size (4 1/2' x 3 3/8') Stampin up container.  And you still have tons of room in the drawer for other items.
I LOVE recycling/reusing items.  I hope you will stop by on Monday and see what other items I have stored in these fabulous containers!

Thanks for stopping by and Happy Crafting!!


Tuesday, June 26, 2012

Happy Birthday Card

Hi everyone!  I am so sorry I haven't been blogging lately.  I am now back to crafting after moving to the east coast!  I just got my craft room put together and am so excited to be crafting again.  I have really missed posting and leaving comments.  I put together this birthday card for my mom.  I LOVE how it turned out. 


I used some white ribbon from my stash for my bow.

 I picked up this basket stamp at a yard sale and I LOVE LOVE LOVE it!!  I used the 3 flower stamp from Stampin Up Best Blossoms for the flowers.  The ink color is Stampin up Regal Rose.  I stamped it once for the deep color and a second time for the lighter color.  I even stamped it a third time in the middle of the basket for an even lighter color.  I LOVE the different shades of pink using one color!  (I didn't clean or reink the stamp between stamping)
 I used three white buttons from my stash and attached them using small glue dots.  The Happy Birthday sentiment is from Close to My Heart Happy Birthday stamp set.
 As for the edges, I used my scissors and ran the blade along the edge to give it a rough looking edge.   I think I like the look but am unsure.  It is different!!  It kinda looks like I need to change my cutting blade :)

I am entering this card in the My Craft Spot Challenge!

Supplies:

  White Cardstock
  Stampin up Regal Rose Cardstock
  White Buttons
  White Ribbon
  Stampin Up Ink:  Regal Rose & Soft Suede
  Stampin Up Best Blossoms stamp set (three flower)
  JRL Design 165 Basket For You stamp
  Close to My Heart Happy Birthday C1257
  Small glue dots
  ATG tape runner
  Bow easy template


Thanks for stopping by and happy crafting!!!

Monday, June 4, 2012

Challenge Me Monday at Fantabulous Cricut

Hi Everyone!!  I am so EXCITED to be the guest designer over at Fantabulous Cricut for the Challenge Me Monday challenge.  The challenge this week is Don't bug me.  Use a bug of some sort.  I created a card for a friend who LOVES bees.  Here is the card I created.


I am so sad that I forgot to take a picture of the inside of the card before I sent it out.  The inside says:

Hope your birthday is as sweet as honey!


I used Everyday Paper Dolls Cricut cartridge for the bee catcher and outfit.  I used tulle for the netting on her hat.  I LOVED how it turned out.  I also used my black pen for outlining the little grooves in the outfit and hat.
 The catchers net was cut using Everyday Paper Dolls.  I know bees are not caught with a net but it was the only thing I would think of.  The grass is cut from Martha Stewart All Occasion Cake cartridge.  I cut it 2 times from 2 different colors of green.
The little bees were cut from the Walk in my Garden Cricut cartridge.
 The clouds were also cut from Everyday Paper Dolls cartridge.  I inked them with outdoor blue from Close to my Heart.  And the Happy Birthday sentiment is also from Close to my Heart.
I am soooo happy with how this card turned out. 


Instructions:

Cardstock from my stash
Close to my heart ink pad outdoor blue
Memento Tuxedo black ink pad
Close to my heart Happy Birthday stamp set
Tulle
Black pen
Cricut Cartridges:
  Everday Paper Dolls
  Walk in my Garden
  Martha Stewart All Occasion Cake

Thanks so much for stopping by and Happy Crafting!!!


Thursday, May 3, 2012

Mother's Day Card

I made a Mother's Day card for a few challenges.  I am really happy with how this card turned out.  Except the background paper in the photo is really orange.  I am not sure why it looks yellow. 


The Happy Mother's Day is a clear rubber stamp.  Sorry I can't remember who makes it :(
 I used a green mat behind my patterned paper.  I also wanted a chocolate/dark brown mat also but because I was using my scraps I didn't have a piece big enough for a mat.  So I cut 1.5 x 1.5 squares out of the dark brown cardstock.  I used 2 squares in opposite corners.   It is a different look!

 I cut the flowers out of white cardstock from the Sweet Treats cartridge (details at bottom of post).   Then I inked them with Stampin Up Pumpkin Pie ink and a finger dauber.  Then using my stylus from my AE2, I rolled each petal toward the center.  Then glued all the flowers together.  Cut the leaves from the Art Philosophy cartridge (details at bottom of post) and inked them with Stampin Up Chocolate Chip ink and a finger dauber.  Also rolled them toward center.  Then added a recycled brown button from an old sweater.  I used chocolate twine in the center of the button. 
 Here is a side view of the flower!


I LOVE using recycled buttons. 

I entered this card in the following challenges:

My Craft Spot Challenge #54 - Mothers Day
Fantabulous Cricut Save the Earth Challenge
Cricut Cardz Challenge #107 - Mothers Day

Supply list:
 Cricut Cartridge:
    Sweet Treats - flowers pg. 50 (shift) cut at 3", 2.75", 2.50"
    Art Philosophy - leaf pg. 62 (shift) cut at 2" , 1.75"
 Cardstock (from my scraps) - dark brown, green, white, patten paper
 Recycled button from old sweater
 chocolate twine
 Happy Mother's Day stamp
 Stampin up ink:
    Chocolate chip
    Pumpkin Pie
 finger dauber
 atg tape runner
 large glue dots
 stylus from AE2 (for curling flowers and leaves)

Thanks for stopping by and happy crafting!!!