Showing posts with label Tutorial. Show all posts

Wednesday, October 17, 2012

TUTORIAL ~ Flowers and Leaves made with dies

Ok Everyone!!  Here is the tutorial on how I made the flowers and leaves from yesterdays card.  Here is the card again.


FLOWERS:  used the scallop die from My Creative Time.

Cut several scallop circles.  You will need one scallop for each flower.

 Cut between every other scallop to the center.  This will make it look like hearts. 
 Now cut a little sliver off between each heart.  You will see there is a little piece that needs to be cut.  This makes them look like perfect hearts and give room between each heart to look more like individual petals.  Now you can curl each heart under and add a center and you have a complete flower.
 If you want more of a daisy flower you now cut each heart down the center.  And then cut a sliver off each daisy petal so there is a bit of a gap between the petals.  Curl the daisy petals under and add a center.  These flowers are beautiful with the edges inked!
 Here is a pic of the two bottom flowers curled under.  I left the top one flat so you could see the difference.


LEAVES:  I used the curly label die from My Creative Time.
 
Cut off both sides.  You can discard the middle.
Now cut from the pointed corner to the middle just above the point on the opposite side.  Do this on the top and bottom of the label for each side.  One label will make 2 leaves.
Discard the middle and keep the top and bottom. 
This is what it looks like plain.
And this is inked with Tim Holtz tea dye distressed ink.  I LOVE the way it gives the look of a vein through the leave.  Now when glueing your leaves together you want to concentrate on the tip.  Make sure each tip meets. 
Now use your fingers to shape the leaf.  The bottom part is more of a base to glue under your flowers.


I am so super proud of this card.  I have been trying to look at my dies to see different ways to use them.  You could also use this technique with your cricut cuts.  I hope you have enjoyed this tutorial and if you have any questions, please feel free to email me or leave a comment!
 
Thanks so much for stopping by and happy crafting!!


Wednesday, January 4, 2012

~ TUTORIAL TIP ~ Don't Be Sad ~ Get GLAD (and Reynolds)!!

Hi everyone!  I hope you are having a great NEW YEAR!!  I wanted to start off the new year with a tutorial on my favorite way to add stickers to your project with ease. 

One of my favorite things to use in my craft room is GLAD Press 'n Seal.  This is one of the best items I could have purchased.  You can use it alone or team it up with Reynolds wax paper and your craft room is complete!  Let me show you:


First cut a small piece of waxed paper and press n seal. (these boxes will last for what seems like forever) It is hard to see from the pictures, but the press n seal has a textured look and the wax paper is smooth.
Next you will want to lay your stickers on the waxed paper.  With the wax paper, you can remove and restick your stickers so if you don't like something you can remove it with ease!
I used my Martha Stewart cutting mat grid lines as a guide so my stickers would be straight.
Once you have your stickers the way you want them, lay a piece of press n seal on TOP of the stickers.
I use my speedball brayer to roll across the to help the press n seal adhere to the stickers.  Then I use my fingers to rub in between the letters.
Next you will SLOWLY pull the press n seal from the wax paper.  The stickers will now be on the back of the press n seal.
Now position your press n seal stickers on your project/layout.


Again I use my speedball brayer and my finger to smooth the press n seal stickers on my project.
SLOWLY peel the press n seal away from your project and it will leave your stickers beautifully on your project.  DON'T throw away the waxed paper or the press n seal paper because you can reuse them for other projects. 

BEAUTIFUL!!

Now you can align your stickers perfectly on your project.  I remember ruining alot of projects because the stickers would be running downhill and I would be constantly trying to pull them off the project and rip either the sticker or the project or BOTH.  Now I LOVE using stickers! 

I hope you enjoyed this tutorial tip and will be able to use this in your craft room!

You can use this same method with your cricut cuts and vinyl!!!  EXCITING!!!

Thanks for stopping by and Happy Crafting!!


Thursday, October 27, 2011

Rosette Tutorial using Border Punches or Gypsy


Hello Everyone!  When I saw the new Cricut cartridge Ribbons & Rosettes, I fell in LOVE!!  I wanted to see if I could make rosettes using the Martha Stewart border punches.  You could also use your gypsy to make them.  The Martha Stewart Cake cartridges have some really nice borders that would work or you could design your own using your gypsy.  I have put together a tutorial on how I did them with the MS border punches.


First cut your paper to your desired size.  My paper measures 2 1/2 x 12.  Depending on how big you want your rosette, will determine how many strips you will need to make.  I used 2 strips to make this rosette.  So you will want to cut 2 strips at 2 1/2 x 12 to make the rosette in this tutorial.
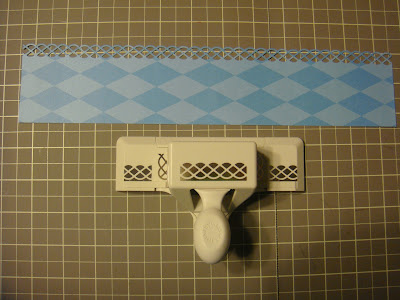
Then using your Martha Stewart border punch, punch one side (12" length).
 Next, I used my Martha Steward score board and scored every 1/4 inch.  I didn't score up to the top where the punch is because I didn't want it to rip.  Just start to score under the punched area to the bottom of the strip.
After you get all your score marks, carefully accordion fold (back and forth) the paper.
 This is what it will look like after it is all folded.

After you make 2 of the strips, you will want to glue the end together.   Now you will need to gather the rosette together so you have a small hole in the middle.  This takes a little patience.  Be careful not to tear the border that you punched.  I punched a small circle and glued to the back to hold it together.  I would recommend using hot glue to glue the circle.  I tried my atg glue gun and it didn't work well so I used hot glue and it seemed to work great.
 Now you can embellish your rosette any way you want.  I chose to use prima flowers and a brad in the center.  I also used hot glue to glue the flower on to the rosette.


 I hope you have enjoyed this tutorial.  Can you imagine all the possibilities with all the different border punches available?  I plan on doing so much with these rosettes.  If you have any questions, please leave me a comment and I will be happy to answer them!

Recipe:

Martha Stewart border punch
Martha Stewart score board
blue scrapbooking paper
prima flowers
black brad

Thanks for stopping by and happy crafting!!