Showing posts with label Doodlecharms. Show all posts

Saturday, February 11, 2012

Lady Bug Card

Hi Everyone!!  I wanted to share a card I made for my little love bug.  I made this card very simple so she could focus on the lady bug.  I am entering this card in the challenge over at My Creative Time.

 I cut the lady bug out from the Doodlecharms Cricut cartridge.
 I used twine for the antennas.  I couldn't decide what I wanted to do for the eyes.  So I filled them in with glossy accents.  I also used my silver ink pad and sponge to ink all over the lady bug.  It gave her a glittered look.
The sentiment is printed from my computer and I used twine around it.  LOVE the way the twine looks!
 I really like how the card turned out.  It seems a bit plain but I didn't want to overdue it for such little eyes!!

Recipe:
 Black and red cardstock
 Sentiment - printed from computer
  Twine - red and black
  glossy accents
  Studio G silver ink pad
  Cricut Cartridge
     Doodlecharms - Lady bug

Thanks for stopping by and happy crafting!!

Friday, October 28, 2011

Halloween box with Rosette Update

Hi Everyone!!  I had a HUGE response to my tutorial that I posted yesterday for the rosettes using the border punch.  Click HERE if you missed the rosette tutorial.  Thanks for all your kind words and emails.  I really appreciate them.  Of course after I made the box and posted it, I decided to draw a spider web under the spider.  So I made another box and left out the twine and added a black satin bow.

The box on the right is the box I made yesterday.  I really like the hand drawn spider web under the spider.  It really adds a lot.  I LOVE both boxes.   I wanted to show you how nice it looked with just the rosette, sentiment, and a bow.  Very simple!


Thanks for stopping by and happy crafting!!

Thursday, October 27, 2011

Halloween Box with Rosette

Hi Everyone!  I made this Halloween box with rosette for the design team call over at My Creative Time with Emma.  Emma has the absolute BEST stamps and dies and it would be such an HONOR to be apart of her design team.  I am super excited how my box turned out.  Click 
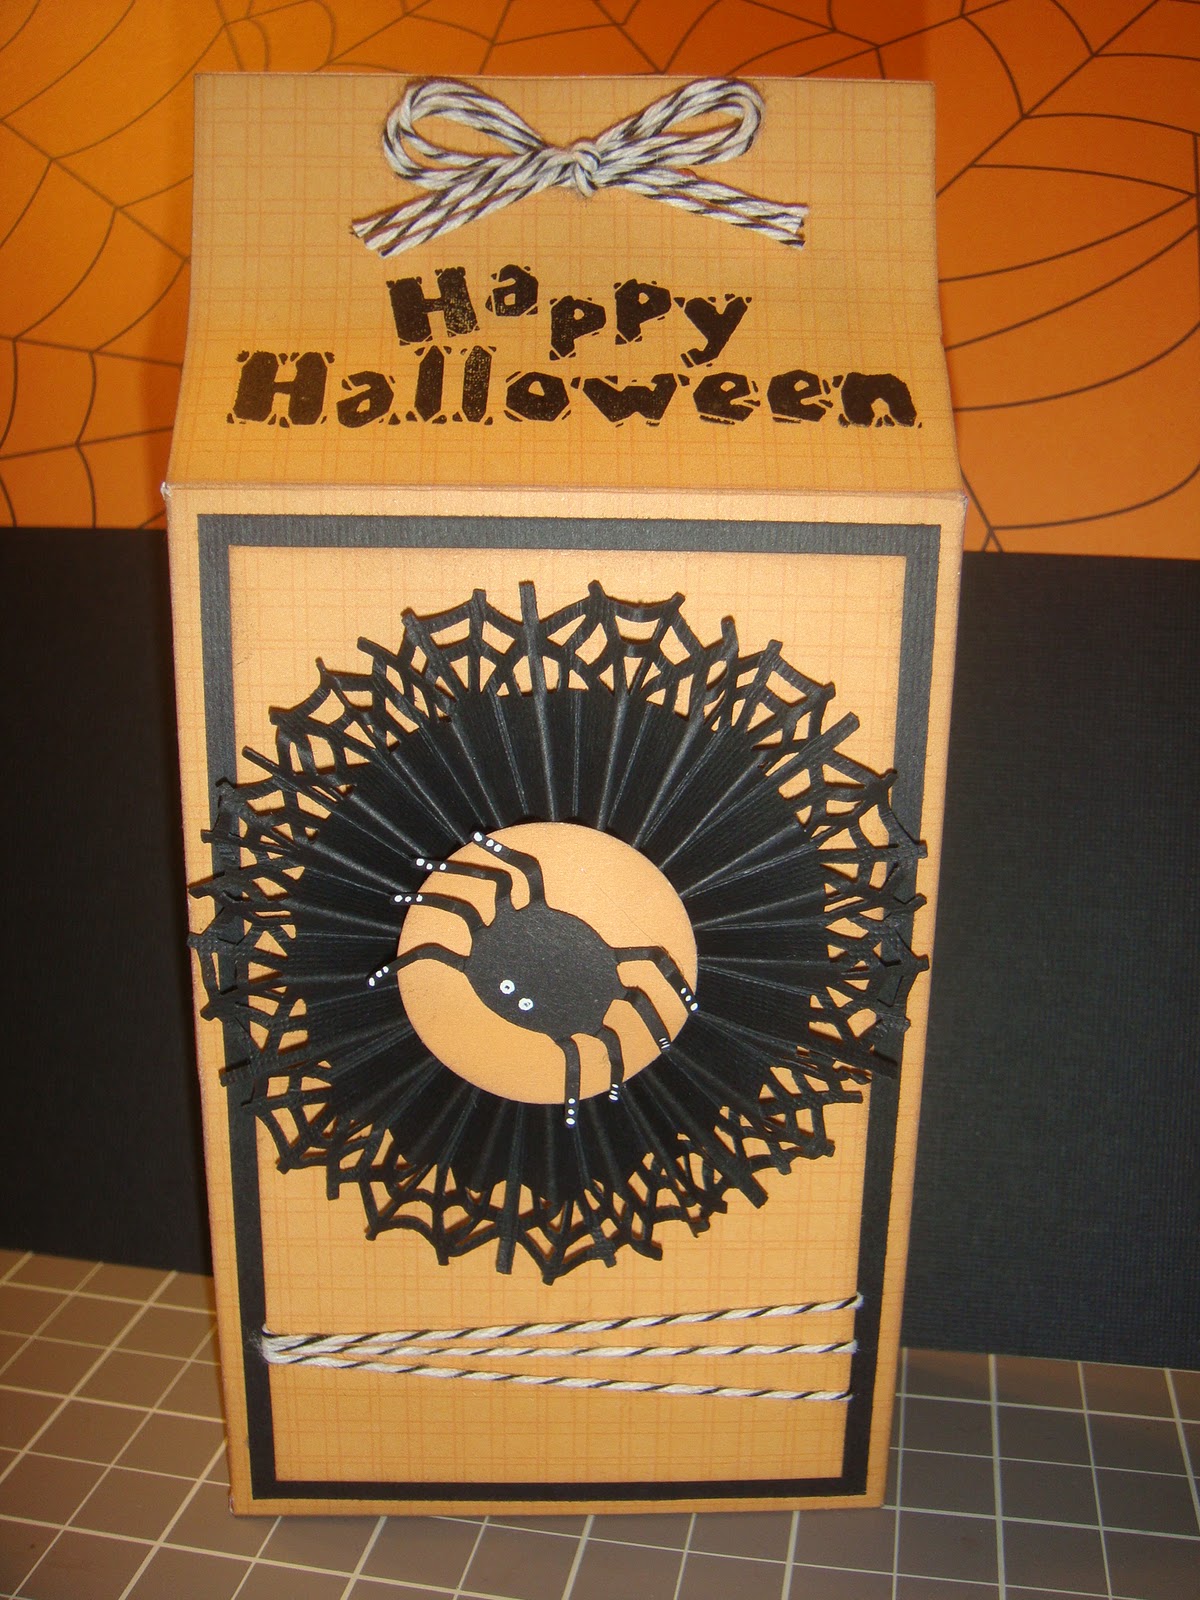
here if you missed my tutorial on how to make these rosettes using Martha Stewart border punches.  For this rosette, I cut my strip at 1 1/2 x 12 and I only used 1 strip to make this rosette.   I found this box template HERE.   This box is FABULOUS!!!!  It is made using a 8 1/2 x 11 piece of cardstock.  Make a few score marks and snip a few corners.  That is it!
 I added some white gel pen dots to the spiders legs and bent them so it would give him some dimension.  I also used black/white twine at the bottom.  I was going to add a small bow, but it looked like it was too much so I decided not to put it on.
I punched 2 holes with my crop-a-dile and used 3 pieces of twine to tie the flaps together.  My advice is to punch the holes BEFORE you assemble the box.  And if you plan to stamp on the flaps, stamp your sentiment BEFORE you assemble the box.  Of course, I did it after I assembled it and it was a little difficult.

I just love this box.  I plan to make some for my child's teacher and put candy inside.  Please check back as I plan to make lots of these boxes for Christmas gifts.

Recipe:

Martha Stewart spider web border punch
Martha Stewart score board
Close to my heart Fall stamp set
black/white twine
orange and black cardstock
white gel pen
Cricut Cartridges:
  Doodlecharm (spider)

I am also entering this box in the Simply Sunday Challenge over at Getting Cricky.


Thanks for stopping by and happy crafting!!

Tuesday, September 27, 2011

Peachy Keen Lets Face it Friday Challenge ~ Sunsine Card

Hello Everyone!!  I made this card for the Peachy Keen Challenge.


Recipe:

Stampin Up Green Galore ink pad
Stampin Up Orchid Opulence ink pad
Peachy Keen In - Stitches Face Stamps
purple sheer riboon
Papers and cardstock from my scraps
Martha Stewart Sepia writing pen
Cricut Cartridges:
  Sweet Treats (flowers)
  Doodlecharms (sun)
  Lacy Labels

Thanks for stopping by and Happy Crafting!!!


Thursday, September 8, 2011

Teacher Treat Bag for PK Challenge

Hi Everyone!  I put together this little treat bag for the Peachy Keen Let's Face It Friday - Back to School Challenge.  This treat bag is super easy!  I baked cookies and my child wanted to take one for the teacher and I thought this was perfect for the challenge.


Recipe:

For A Special Teacher - hand written
Homemade Cookie
Ziplock Sandwich Bag
School Paper from my scraps
Stampin Up Chocolate Chip ink pad
Martha Stewart Writing Pen - Sepia
Peachy Keen Basic Paper Doll Face Stamp - 1 3/8"
Cricut Cartridges:
  Lacy Labels - base
  Doodlecharms - apple

Thanks for stopping by and happy crafting!!