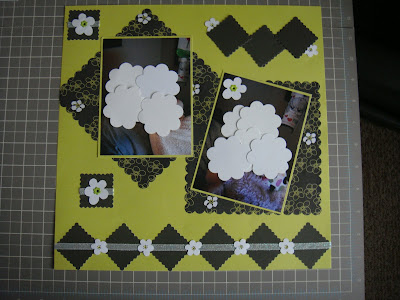
Hi Everyone!! This is a super easy layout using squares for the background and border.
I started off with lime green cardstock. The pattern paper is from Michaels Dollar section (I bought it around Christmas time). There was several pieces of scalloped squares in the package. I turned one square to look like a diamond shape and left the other the square.
Next I cut the white flowers from Walk in my Garden Cricut Cartridge and used lime green eyelets for the centers.
Here are 1 x 1 inch black squares turned to look like diamonds for the border at the bottom of the page. I also have some squares at the top right corner for journaling. I attached some white glittered ribbon and cut more flowers from WIMG cartridge. I added some lime green to the back of the flowers so you would see it through the center and added some black dots with a black pen. I wanted them to look like the patterned paper flowers.
I am really happy how this turned out. This would also look wonderful with the edges of the squares inked. I wanted to keep it simple!
Recipe:
Lime Green Cardstock
Pattern Paper Squares
Ribbon
Flower Eyelets
Black gel pen
Walk in my Garden Cricut Cartridge
Thanks for stopping by and happy crafting!!
Tuesday, May 31, 2011
Wednesday, May 25, 2011
My 2nd Blog Award!!!
Thanks so much Julie from http://designs-by-julie.blogspot.com/ for this award. I appreciate it soooo much!
Upon receiving this award, I must tell 5 cricut related things about myself:
1. I bought my first cricut expression on the way to the hospital to give birth (black friday)
2. I LOVE my gypsy!!
3. I have too many cartridges to count and want MORE!!
4. I try to have at least 1 cricut cut on my project.
5. I REALLY REALLY REALLY want the new Expression 2
Now I must share this award with other blogs that are Cricut-tastic!!
http://juliescraftyspot.blogspot.com/
http://danascraftycorner.blogspot.com/
http://scrappinrainacm.blogspot.com/
http://septemberninth.blogspot.com/
Thursday, May 19, 2011
Making Photo Corners Tutorial 2
Hi Everyone!! I have had several people ask if my photo corners adhere directly to my photos. The photo corners from the tutorial yesterday do ahere directly onto my photos. I did some figuring last night and made a tutorial 2. In this tutorial, the photo corners slide onto the photo and can be adhered to the back of the photos. This tutorial 2 is just like the first one with a few more easy steps.
Cut your 1 1/2 x 1 1/2 inch square corner to corner making 4 triangles. (If you like, try experimenting with different size squares to get larger or smaller photo corners.)
Next use a scoring system, score the 2 sides of the photo corners. I used my Martha Stewart Scoreboard. I lined up the side of the photo corners with the next score line to make sure they were straight. I scored both of the straight sides of the photo corners.
You can choose to cut the little square at the corner OR
cut straight across.
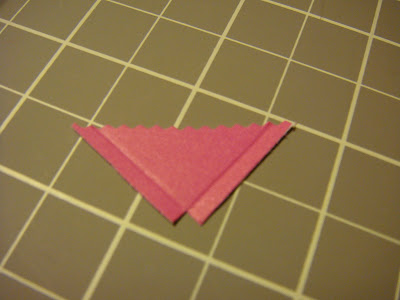
Lastly, fold your photo corner at the score marks. I did NOT use a bone folder for this as I wanted them to stand up a bit to slide on my photo.
Here is how they turned out!
The top 2 corners are from yesterday's tutorial and the bottom 2 are from today's. I wanted to show you the difference.

I hope you have fun with these photo corners!
Thanks so much for stopping by and happy crafting!!!
Cut your 1 1/2 x 1 1/2 inch square corner to corner making 4 triangles. (If you like, try experimenting with different size squares to get larger or smaller photo corners.)
Next use a scoring system, score the 2 sides of the photo corners. I used my Martha Stewart Scoreboard. I lined up the side of the photo corners with the next score line to make sure they were straight. I scored both of the straight sides of the photo corners.
You can choose to cut the little square at the corner OR
cut straight across.
Lastly, fold your photo corner at the score marks. I did NOT use a bone folder for this as I wanted them to stand up a bit to slide on my photo.
Here is how they turned out!
The top 2 corners are from yesterday's tutorial and the bottom 2 are from today's. I wanted to show you the difference.

I hope you have fun with these photo corners!
Thanks so much for stopping by and happy crafting!!!
Wednesday, May 18, 2011
Making Photo Corners & Beautiful Birthday Layout
Hi everyone!! I LOVE photo corners. I wanted to show you a quick and simple way to make photo corners. I used a 1 1/2 by 1 1/2 square. This is a square I got in a kit, but you can find many decorative squares on many of the cricut carts.
Cut the square from corner to corner making 4 triangles. I used my Martha Stewart paper cutter. It may have been easier to use a ruler and a craft knife.
It is that easy!!! I added a few dots with my white gel pen.
Imagine the endless possiblities with all the cricut carts.
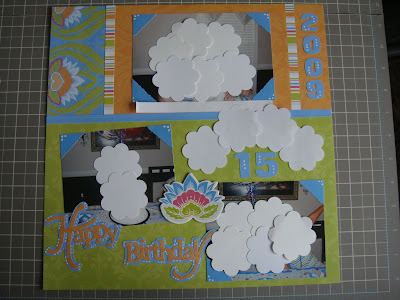
Here is the entire birthday layout I made with the photo corners.
Can you tell I LOVE my white gel pen? Enjoy and have fun creating photo corners!
Recipe:
Paper & Embellishments are from a kit
White Gel Pen
Gypsy Wandering Cricut Cartridge (Happy Birthday)
DonJuan Cricut Cartridge (Numbers)
Thanks for stopping by and happy crafting!!
Wednesday, May 11, 2011
Coloring Your Stamped Image
I created this card for the Peachy Keen Challenge. I stamped my flower and leaves and then used my Stampin Up Watercolor Pencils and Blender pens. This is the first time I have done coloring with my stamped images. I really had fun with this and will definitely do it again!
Recipe:
Provo Craft Zany Zoo Sky Blue Paper
Green Adhesive Paper
Flower & Leaf Stamps
Black Ink
Stampin Up Watercolor Pencils
Stampin Up Blender Pens
"Thinking of you" Stamp
3 bling rhinestones
Thanks for stopping by and have a great day!!!
Recipe:
Provo Craft Zany Zoo Sky Blue Paper
Green Adhesive Paper
Flower & Leaf Stamps
Black Ink
Stampin Up Watercolor Pencils
Stampin Up Blender Pens
"Thinking of you" Stamp
3 bling rhinestones
Thanks for stopping by and have a great day!!!
Cute BABY layout #2
Todays layout is another BABY layout. I put some more of the flowers from yesterdays layout on this one as well. I really LOVE the flowers!
Recipe:
DCWV Nana's Nursery Paper (background)
Bazzill Bling Cardstock
White Gel Pen
Paper Lace Cricut Cartridge (font)
Paisley Cricut Cartridge (flowers)
Thanks for stopping by and have a great day!!!
Recipe:
DCWV Nana's Nursery Paper (background)
Bazzill Bling Cardstock
White Gel Pen
Paper Lace Cricut Cartridge (font)
Paisley Cricut Cartridge (flowers)
Thanks for stopping by and have a great day!!!
Tuesday, May 10, 2011
Baby Layout
Todays layout is a BABY layout. This is sooo cute. I tried to pull the colors and flowers from the baby's outfit. The DCWV paper and the Bazzill Bling cardstock really went well together. I used the Bazzill Bling 8x8 cardstock for the font, flowers and the pink mat. I may have went overboard with the flowers but they were so cute I couldn't resist!
Recipe:
DCWV Nana's Nursery Paper (striped background paper)
Bazzill Bling 8x8 pink, green, yellow, & orange cardstock (pink paper, flowers, & font)
White Gel Pen
Paisley Cricut Cartridge (flowers)
Paper Lace Cricut Cartridge (font)
Thanks for stopping by and have a great day!!!
Recipe:
DCWV Nana's Nursery Paper (striped background paper)
Bazzill Bling 8x8 pink, green, yellow, & orange cardstock (pink paper, flowers, & font)
White Gel Pen
Paisley Cricut Cartridge (flowers)
Paper Lace Cricut Cartridge (font)
Thanks for stopping by and have a great day!!!
Monday, May 9, 2011
13th Birthday Layout
Good Morning Everyone!! I hope everyone had a wonderful weekend and Mothers Day!! I am going to be showing layouts this week that I have done. I am trying to keep the layouts for this week simple. So please stop back everyday this week to see a new layout.
Todays layout is a BIRTHDAY layout! I really liked how this one turned out. I started this layout with the "13". It is actually the front of a greeting card that the child received for her birthday. I chose the colors from the colors in the "13". I started off with plain hot pink cardstock. Then I added plain orange squares of cardstock. I didn't have any pattern paper that would work for this layout so I made my own. I stamped birthday hats with hot pink ink on the orange cardstock. The "13" also had glitter on it, so I used a glue pen and glitter to highlight the letters in Happy Birthday and the C in Caitlin. Shows up better in person. Also used a small hole punch with yellow cardstock to make the small dots on the page. It turned out really cute!!
Recipe:
Hot Pink, Yellow, & Orange Cardstock
Birthday Hat stamp
Hot pink ink
Glue pen & glitter
Martha Stewart Elegant Cake Art Cricut Cartridge
Thanks for stopping by and have a great day!!
Thursday, May 5, 2011
Cupcake Card
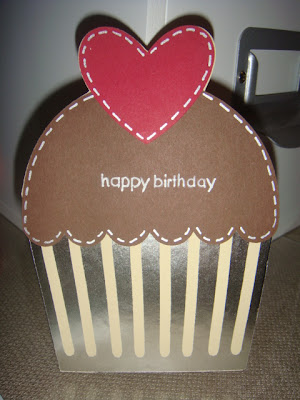
I made this cupcake card for my WONDERFUL husband! It is super simple and I made the cupcake liner using silver wrapping paper I bought at christmas time from the dollar tree. You could also use foil for the same look.
Recipe:
Silver wrapping paper
Brown, red, cream cardstock
white gel pen
happy birthday stamp
Sweet Treats Cricut Cartridge
Thanks for stopping by and have a great day!!!
Recipe:
Silver wrapping paper
Brown, red, cream cardstock
white gel pen
happy birthday stamp
Sweet Treats Cricut Cartridge
Thanks for stopping by and have a great day!!!
Monday, May 2, 2011
Birthday Layout for PK Challenge
This is the banner birthday layout I did for the Peachy Keen Challenge. I really liked how it turned out. I tried to keep it simple. I love how vivid the colors of the balloons are. This is the first banner I have made and although it was a little time consuming, I LOVED how it turned out! I will definitely be making banners again. I stamped Peachy Keen Faces on the balloons and plan on doing my journaling under them.
Recipe:
Balloon Pattern Paper
Cordinating Red, Yellow, & Blue Cardstock
Peachy Keen Face Stamps
Martha Stewart Punch
Corner Punch
White String for balloons and banner
Cricut Celebrations Cartridge
Thanks for stopping by and have a great day!!!
Recipe:
Balloon Pattern Paper
Cordinating Red, Yellow, & Blue Cardstock
Peachy Keen Face Stamps
Martha Stewart Punch
Corner Punch
White String for balloons and banner
Cricut Celebrations Cartridge
Thanks for stopping by and have a great day!!!
Subscribe to:
Posts (Atom)


